
 OK, I confess. I find the complimentary warm bread and butter, the best indicators of what is to follow at a restaurant. If the bread hits the spot, then somehow everything else falls into place. And, I have never turned down a refill of my empty bread plate! Ever.
So, while perusing one of my favorite blogs, Smitten Kitchen, I was very motivated to make bread at home. Sometime back I had used one of SK's recipes for homemade pizza with much success. That experience redeemed bread making at home for me and while I have made pizza many times at home since then (but ofcourse! It's pizza!), I had yet to venture into the sphere of real breads.. And, I mean yeast bread that work on timetables and all the kneading and degas-ing and stuff..
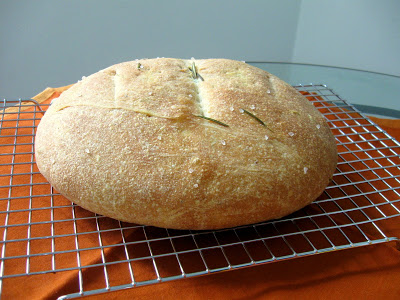
I have always wanted to take a course on bread and pastry making but the three-digit price tags have daunted me. So, armed with a library copy of The Bread Bible and a simple looking recipe on SK, I decided to give it a try. And, for opening night, I chose, Potato and Rosemary Bread!
Now, I did my homework! I read up on the techniques and terms (like biga, sponge etc.) used in bread making and was reassured by Ms. Beranbaum (author of The Bread Bible) that hands are indeed sufficient tools for all the labor involved (and no, I did not get my excuse for making another purchase.. nevertheless..!). And most importantly, I realized that I have to plan to make most breads because they need some starter material (the biga, in this case) that needs to sort of ferment overnight to be at its prime!
 But, I persevered. And the fruits of my labor were flavorful indeed. In truth, it was not that much effort really. There are a just few important things to keep in mind -
- Use fresh yeast - Yeast is a living organism that ferments the sugars into CO2 which creates the spongy texture of breads. So, the fresher it is, the more potent. I used the rapid rising variety.
- Be patient - Yes, it can be very hard for some of us to wait for the dough to become sufficiently elastic without biting nails or tapping foot, but patience has its merits. An under-risen dough will be tough and very dense.
- Beware the right starter/pre-ferment - Many breads need a starter or pre-ferment that kick starts the fermenting in the actual bread dough. Different breads need different types of starters that pre-ferment for different times. Plan your bread making with sufficient time for this starter.
- Knead just enough - The idea of kneading is to ensure that the ingredients, especially the yeast, is even spread around the dough for even rising. Stop kneading once the dough is supple and soft but not sticky. Do not over knead. It will make the dough very tough.
- Always test your dough - Although timings are given, they are only indicative. The only sure way of knowing if the dough is ready is to do a test. The simplest one that supposedly works for all breads is the Dimple Test; Make a dimple on the dough surface with your finger and the dough should not rise to fill it completely when you release.
- Test your oven temperature - Some ovens are good at retaining heat, and some sadly not, when the door is opened. This is terribly important in the first 10 minutes of baking as the yeast's fermenting process completes insides the hot oven during this time. So, if you think your oven is not very retentive, they pre-heat to 50 degrees higher and turn the temperature back down once the bread is in.
- Garnish into the dough, not on it - I learnt this hard way. If you are using something like rosemary, in this case, as a garnish on top of the bread, make sure it's fully embedded into the dough or it will burn in the oven.
- Let bread rest - More of the patience needed here, especially in the face of the wonderful aroma from the fresh bread. But, desist from slicing before it rests for the full time mentioned.
Potato and Rosemary Bread
(adapted from Smitten Kitchen)
I made only one loaf, so it was bit tricky scaling down the measurements but some approximation is ok.
4 oz biga (recipe below)
1-1/2 cups bread flour + plus extra for kneading
1 tsp salt
1/2 tsp pepper
5/8 tsp rapid rising yeast
1/2 cup mashed potatoes
1 T olive oil
1 T chopped fresh rosemary
1/2 cup water at room temperature
Olive oil for brushing on top
Remove the biga from the refrigerator 1 hour before you plan to make the bread. Cut it into about 10 small pieces with a knife. Cover with a plastic wrap or damp towel and let sit for 1 hour.
Once the biga has thawed, stir together the flour, salt, black pepper, and yeast. Add the biga pieces, mashed potatoes, oil, rosemary, and water. Work the ingredients into a ball. Add more water, if necessary, or more flour, if the dough is too sticky.
 Transfer the dough to a well-floured surface and knead for approximately 10 minutes, adding flour if needed, until the dough is soft and supple, tacky but not sticky. Gather the dough into a ball. Lightly oil a large bowl and transfer the dough to the bowl, rolling it around to coat it with oil. Cover the bowl with plastic wrap. Ferment at room temperature for approximately 2 hours, or until the dough doubles in size. Test the dough with the dimple test.
Line a sheet pan with parchment paper. Shape each of the larger pieces into a boule (oblong round) and place the dough on the parchment. Brush the dough with oil and cover loosely with plastic wrap.
Proof at room temperature for 1 to 2 hours (depending on the size of the pieces), or until the dough doubles in size. The dough should pass the Dimple test again.
Preheat the oven to 400 degrees F for 15 minutes with the oven rack on the middle shelf. Remove the plastic from the dough and lightly brush the bread with olive oil. You do not need to score these breads, but you can if you prefer.
Place the baking sheet in the oven. Bake the loaf for 20 minutes, then rotate the pan 180° for even baking. The bread takes 35 to 45 minutes total to bake. The loaves and rolls will be a rich golden brown all around, and the internal temperature should register at least 195°F (check the temperature).
(The loaf should make a hollow sound when thumped on the bottom. If the loaf is fully colored but seems too soft, turn off the oven and let them bake for an additional 5 to 10 minutes to firm up.)
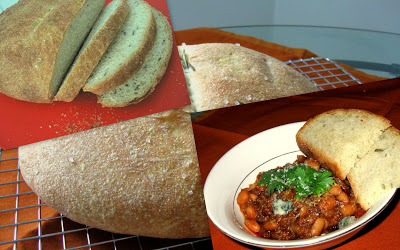
Remove the bread from the oven and cool on a rack for at least 1 hour for loaves.
Biga
(~16 oz)
Biga will keep in the refrigerator for up to 3 days, or in the freezer for about 3 months. You can use it as soon as it ferments, but I prefer to give it an overnight retarding to bring out more flavor.
2 1/2 cups unbleached bread flour
1/2 tsp rapid rising yeast
3/4 to 1 cup water, at room temperature
Stir together the flour and yeast. Add water slowly, stirring until everything comes together and makes a coarse ball. It is okay if the dough is a bit sticky, you can correct for it when kneading. It is harder to add water once the dough firms up.
Transfer the dough to a well-floured surface. Knead for 4 to 6 minutes until the dough is soft and pliable, tacky but not sticky. Lightly oil a bowl and transfer the dough to the bowl, rolling it around to coat it with oil. Cover the bowl with plastic wrap and ferment at room temperature for 2 to 4 hours, or until it nearly doubles in size.
Remove the dough from the bowl, knead it lightly to degas, and return it to the bowl, covering the bowl with plastic wrap. Place the bowl in the refrigerator overnight.
This recipe has been yeastspotted!