
The January 2010 Daring Bakers’ challenge was hosted by Lauren of Celiac Teen. Lauren chose Gluten-Free Graham Wafers and Nanaimo Bars as the challenge for the month. The sources she based her recipe on are 101 Cookbooks and http://www.nanaimo.ca/.
Right off the bat, let me say that I LOVED this challenge! Now, for the irony and a teeny confession - I am NOT a fan of chocolate! Yes, I know, makes you gawk, what with my HUGE sweet tooth, love for baking, such and such. But, the truth is, if I had a choice between something largely chocolate-y and another, then inevitably, I would choose the latter!! (unless it's rice pudding...)
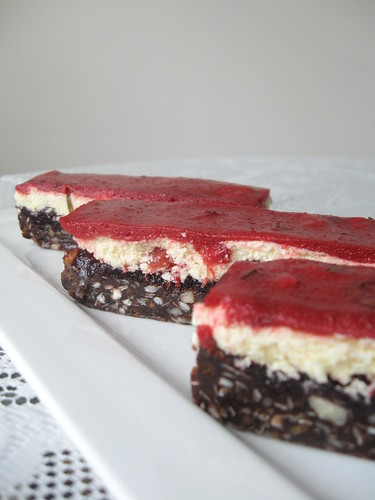
When I first read the recipe, I was a bit distressed (yes yes, that much!) by the amount of chocolate it called for. Then the thinking cap went on, creativity kicked in.. and love followed! :-) My version of the Nanaimo Bars went from intensely chocolate to intensely berry! That is not to say that this creation of mine is not without further contradictions... You'll find out along the post! :)
One of the things that I liked about the recipe was that it is a no bake version (err...) and that it has multiple layers, each requiring some chilling time before the next layer could be added on. That gave me ample time to figure out the flavors for the subsequent layers. I actually made this dessert over two days. And, happily as Lauren said, these bars can be frozen to be enjoyed much later as well, whenever craving strikes! I already have some set aside in the freezer..!:)
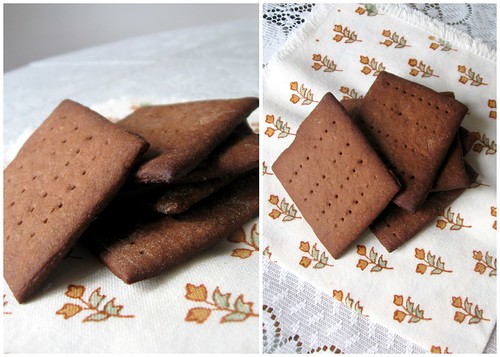
Part of the pushing the limits in this challenge was to make the graham crackers, gluten free. I did not push myself here. I used pastry flour that I had left over from the Vol-au-vent challenge. And, guess what?! I made chocolate grahams! Yep! The idea being that it would go better with the chocolate base of the bar. In truth, I am not sure, if it lent additional flavor because the chocolate pudding base is itself very strong and the subtlety from the crackers would, perhaps, be missed.
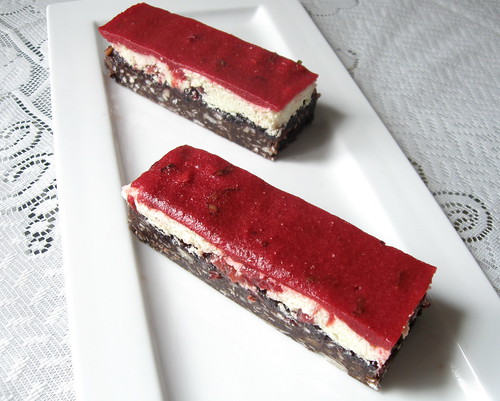
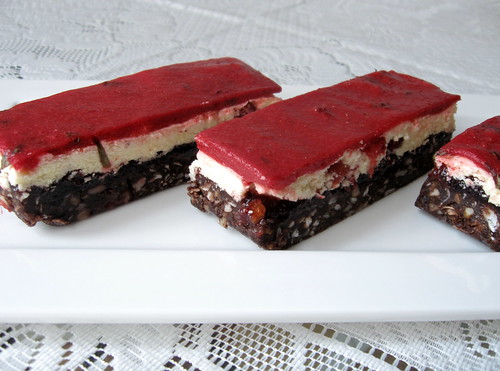
From here on, came my changes. My bars have four layers. Over the base layer of chocolate, nuts, shredded coconut and crackers, I spread a thin layer of warm homemade blueberry jelly. Well, the jam was intended to be a pate but misread proportions and a malfunctioning thermometer resulted in a jelly rather than the firmer pate. Err.. well. All good, after all spying a jar of this spurred the berry saga! :)
For the custard layer, I used lemon pudding powder to give a subtle citrus twist and then folded in strawberries. I used the frozen ones, thawed out because I like their texture in this application better than fresh ones. They are easier to work with while spreading as well.
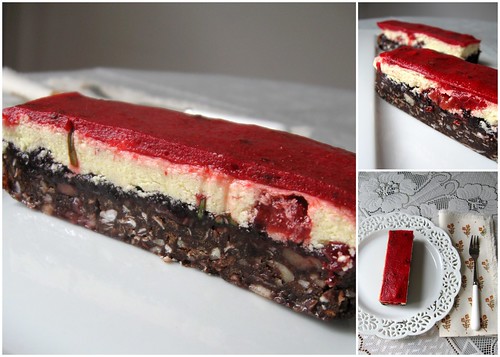
And for the final layer, instead of ganache, I went with strawberry-basil glaze. Now, this being a Canadian dessert, I can honestly say that the inspiration for this last year, was very Canadian. On our trip to Montreal, we patronised this awesome bakery, Premeire Moisson, quite a bit. One of their pastries was coated with a hibiscus-raspberry glaze which gave it such an appealing look, flavor and texture. It stuck in my mind. So, there, truly Canadian, you see! :)
I was thrilled to find an opportunity to make and use a similar glaze here. I played around with the proportion to get the right consistency. What I ended up with was a layer with an intense flavor of the berry cut very mildly by the herb.
The flavors in each bite? The first flavor to hit you is berry and it stays through the bite but its intensity is cut by the chocolate kicking in and then coconut and the almonds! The chocolate was definitely there but not at all overwhelming and was in perfect balance with the fruit itself.
And the icing on the cake - the ultimate compliment - Mr. FSK endorsed it. He asked for more! Sighh.. I am in bliss land!! :)
On another but related note, I just wanted to do a Thank You shout out to wonderful Lauren for her effort in putting together A Hand for Haiti. She is creating an e-cookbook with contributions from food bloggers of their favorite comfort recipes.
This is what she said "With that said, if you're a blogger, send me your favourite, most loved recipe that makes you feel at home. The recipe does not have to be gluten free. It can be a baked good, a meal, a breakfast, a treat, anything. Whatever it is though, make sure it makes you think of home. They lost theirs, so a comforting dish is the best way in my eyes!"
She is sixteen!! Can you believe that?!! Kudos to you Lauren and thanks for this fabulous challenge! :)
Very Berry Nanaimo Bars
(makes a 9x5 inch sheet)
** If you'd like to make the original recipe for these bars, you can use the recipe here **
** I placed parchment paper at the bottom of my pan allowing overhangs on all sides for easy removal and to make sure the bars don't stick any where **
Bottom Layer
1/4 cup Unsalted Butter room temperature
1/8 cup Granulated Sugar
2.5 T Unsweetened Cocoa
1 egg yolk, beaten
2/3 cup chocolate Graham Wafer Crumbs (recipe below)
1/4 cup Almonds, chopped
1/2 cup shredded, sweetened Coconut
Second Layer
1/2 cup blueberry jelly warmed to spreadable consistency
Third Layer
1/4 cup unsalted Butter, room temperature
2 T whole milk
1.5 T Instant Lemon pudding mix
3/4 cup powdered Sugar /icing sugar
4-5 frozen strawberries, thawed and rough chopped
Top Layer
1 cup strawberry syrup (recipe below)
1/2 T strawberry gelatin
2 tsp fresh basil chiffonade
For bottom Layer: Melt unsalted butter, sugar and cocoa in top of a double boiler. Add egg yolk and stir to cook and thicken. Remove from heat. Stir in crumbs, nuts and coconut. Press firmly into an ungreased 9x5 pan.
For Second Layer: Spread the warmed berry jelly evenly over the bottom layer. Refrigerate for atleast an hour for it to set.
For Third Layer: Cream butter, cream, custard powder, and icing sugar together well. Beat until light in colour. Fold in the chopped berries. Spread over bottom layer. Refrigerate for atleast two hours before spreading the next layer.
For Top Layer: Add the gelatin to the hot strawberry syrup and whisk to completely incorporate. Make sure that the gelatin is fully dissolved to avoid clumps. Refrigerate for 30 minutes or so until the mixture is cool but is still spreadable. Cover the custard with the glaze evenly and refrigerate overnight.
To serve, remove from pan, cut thick slices like cakes! :)
Strawberry Syrup
1 cup frozen strawberries, thawed
1/2 cup water
3 T sugar
Pulse the strawberries along the thawing liquid and water to a fine puree. In a sauce pan, bring the strawberry puree and sugar to a boil. Remove from heat. You can strain the liquid, if you want a translucent syrup.
This will make more than you need for the recipe. Refrigerate the rest and use as coulis over desserts/ice cream.
Graham Crackers
(adapted from 101 Cookbooks)
** Keep an eye on the crackers in the oven. The cocoa tends to suck moisture out and the crackers can easily burn if you are not careful. I burnt my first batch, I know! **
1-1/4 cups pastry flour
3/4 T unsweetened cocoa powder
1/3 cup brown sugar
1/2 tsp baking soda
1/4 tsp baking powder
1/2 tsp salt
3-1/2 T unsalted butter, cut into 1-inch cubes and frozen
1/6 cup mild-flavored honey, such as clover
2-1/2 T whole milk
1 T vanilla extract
Combine the flour, cocoa, brown sugar, baking soda, and salt. Cut in the butter to make a mixture with the consistency of a coarse meal.
In a small bowl, whisk together the honey, milk, and vanilla extract. Add to the flour mixture and mix until the dough barely comes together. It will be very soft and sticky.
Turn the dough out onto a lightly floured work surface and pat the dough into a rectangle about 1 inch thick. Wrap in plastic and chill until firm, about 2 hours or overnight.
Sift an even layer of flour onto the work surface and roll the dough into a long rectangle about 1/8 inch thick. The dough will be sticky, so flour as necessary. Cut 3 inch squares of the dough. Gather the scraps together and set aside. Place the crackers on one or two parchment-lined baking sheets and chill until firm, about 30 to 45 minutes.
Adjust the oven rack to the upper and lower positions and preheat the oven to 350 degrees. Gather the scraps together into a ball, chill until firm, and reroll. Dust the surface with more flour and roll out the dough to get about two or three more crackers.
Mark a vertical line down the middle of each cracker, being careful not to cut through the dough. Using a toothpick or skewer, prick the dough to form two dotted rows about 1/2 inch for each side of the dividing line.
Bake for 11-12 minutes, until browned and slightly firm to the tough, rotating the sheets halfway through to ensure even baking. Cool on rack for a few minutes.
Please visit the Daring Kitchen to see what other fabulous bakers have created this month!
Right off the bat, let me say that I LOVED this challenge! Now, for the irony and a teeny confession - I am NOT a fan of chocolate! Yes, I know, makes you gawk, what with my HUGE sweet tooth, love for baking, such and such. But, the truth is, if I had a choice between something largely chocolate-y and another, then inevitably, I would choose the latter!! (unless it's rice pudding...)
When I first read the recipe, I was a bit distressed (yes yes, that much!) by the amount of chocolate it called for. Then the thinking cap went on, creativity kicked in.. and love followed! :-) My version of the Nanaimo Bars went from intensely chocolate to intensely berry! That is not to say that this creation of mine is not without further contradictions... You'll find out along the post! :)
One of the things that I liked about the recipe was that it is a no bake version (err...) and that it has multiple layers, each requiring some chilling time before the next layer could be added on. That gave me ample time to figure out the flavors for the subsequent layers. I actually made this dessert over two days. And, happily as Lauren said, these bars can be frozen to be enjoyed much later as well, whenever craving strikes! I already have some set aside in the freezer..!:)
Part of the pushing the limits in this challenge was to make the graham crackers, gluten free. I did not push myself here. I used pastry flour that I had left over from the Vol-au-vent challenge. And, guess what?! I made chocolate grahams! Yep! The idea being that it would go better with the chocolate base of the bar. In truth, I am not sure, if it lent additional flavor because the chocolate pudding base is itself very strong and the subtlety from the crackers would, perhaps, be missed.
From here on, came my changes. My bars have four layers. Over the base layer of chocolate, nuts, shredded coconut and crackers, I spread a thin layer of warm homemade blueberry jelly. Well, the jam was intended to be a pate but misread proportions and a malfunctioning thermometer resulted in a jelly rather than the firmer pate. Err.. well. All good, after all spying a jar of this spurred the berry saga! :)
For the custard layer, I used lemon pudding powder to give a subtle citrus twist and then folded in strawberries. I used the frozen ones, thawed out because I like their texture in this application better than fresh ones. They are easier to work with while spreading as well.
And for the final layer, instead of ganache, I went with strawberry-basil glaze. Now, this being a Canadian dessert, I can honestly say that the inspiration for this last year, was very Canadian. On our trip to Montreal, we patronised this awesome bakery, Premeire Moisson, quite a bit. One of their pastries was coated with a hibiscus-raspberry glaze which gave it such an appealing look, flavor and texture. It stuck in my mind. So, there, truly Canadian, you see! :)
I was thrilled to find an opportunity to make and use a similar glaze here. I played around with the proportion to get the right consistency. What I ended up with was a layer with an intense flavor of the berry cut very mildly by the herb.
The flavors in each bite? The first flavor to hit you is berry and it stays through the bite but its intensity is cut by the chocolate kicking in and then coconut and the almonds! The chocolate was definitely there but not at all overwhelming and was in perfect balance with the fruit itself.
And the icing on the cake - the ultimate compliment - Mr. FSK endorsed it. He asked for more! Sighh.. I am in bliss land!! :)
On another but related note, I just wanted to do a Thank You shout out to wonderful Lauren for her effort in putting together A Hand for Haiti. She is creating an e-cookbook with contributions from food bloggers of their favorite comfort recipes.
This is what she said "With that said, if you're a blogger, send me your favourite, most loved recipe that makes you feel at home. The recipe does not have to be gluten free. It can be a baked good, a meal, a breakfast, a treat, anything. Whatever it is though, make sure it makes you think of home. They lost theirs, so a comforting dish is the best way in my eyes!"
She is sixteen!! Can you believe that?!! Kudos to you Lauren and thanks for this fabulous challenge! :)
Very Berry Nanaimo Bars
(makes a 9x5 inch sheet)
** If you'd like to make the original recipe for these bars, you can use the recipe here **
** I placed parchment paper at the bottom of my pan allowing overhangs on all sides for easy removal and to make sure the bars don't stick any where **
Bottom Layer
1/4 cup Unsalted Butter room temperature
1/8 cup Granulated Sugar
2.5 T Unsweetened Cocoa
1 egg yolk, beaten
2/3 cup chocolate Graham Wafer Crumbs (recipe below)
1/4 cup Almonds, chopped
1/2 cup shredded, sweetened Coconut
Second Layer
1/2 cup blueberry jelly warmed to spreadable consistency
Third Layer
1/4 cup unsalted Butter, room temperature
2 T whole milk
1.5 T Instant Lemon pudding mix
3/4 cup powdered Sugar /icing sugar
4-5 frozen strawberries, thawed and rough chopped
Top Layer
1 cup strawberry syrup (recipe below)
1/2 T strawberry gelatin
2 tsp fresh basil chiffonade
For bottom Layer: Melt unsalted butter, sugar and cocoa in top of a double boiler. Add egg yolk and stir to cook and thicken. Remove from heat. Stir in crumbs, nuts and coconut. Press firmly into an ungreased 9x5 pan.
For Second Layer: Spread the warmed berry jelly evenly over the bottom layer. Refrigerate for atleast an hour for it to set.
For Third Layer: Cream butter, cream, custard powder, and icing sugar together well. Beat until light in colour. Fold in the chopped berries. Spread over bottom layer. Refrigerate for atleast two hours before spreading the next layer.
For Top Layer: Add the gelatin to the hot strawberry syrup and whisk to completely incorporate. Make sure that the gelatin is fully dissolved to avoid clumps. Refrigerate for 30 minutes or so until the mixture is cool but is still spreadable. Cover the custard with the glaze evenly and refrigerate overnight.
To serve, remove from pan, cut thick slices like cakes! :)
Strawberry Syrup
1 cup frozen strawberries, thawed
1/2 cup water
3 T sugar
Pulse the strawberries along the thawing liquid and water to a fine puree. In a sauce pan, bring the strawberry puree and sugar to a boil. Remove from heat. You can strain the liquid, if you want a translucent syrup.
This will make more than you need for the recipe. Refrigerate the rest and use as coulis over desserts/ice cream.
Graham Crackers
(adapted from 101 Cookbooks)
** Keep an eye on the crackers in the oven. The cocoa tends to suck moisture out and the crackers can easily burn if you are not careful. I burnt my first batch, I know! **
1-1/4 cups pastry flour
3/4 T unsweetened cocoa powder
1/3 cup brown sugar
1/2 tsp baking soda
1/4 tsp baking powder
1/2 tsp salt
3-1/2 T unsalted butter, cut into 1-inch cubes and frozen
1/6 cup mild-flavored honey, such as clover
2-1/2 T whole milk
1 T vanilla extract
Combine the flour, cocoa, brown sugar, baking soda, and salt. Cut in the butter to make a mixture with the consistency of a coarse meal.
In a small bowl, whisk together the honey, milk, and vanilla extract. Add to the flour mixture and mix until the dough barely comes together. It will be very soft and sticky.
Turn the dough out onto a lightly floured work surface and pat the dough into a rectangle about 1 inch thick. Wrap in plastic and chill until firm, about 2 hours or overnight.
Sift an even layer of flour onto the work surface and roll the dough into a long rectangle about 1/8 inch thick. The dough will be sticky, so flour as necessary. Cut 3 inch squares of the dough. Gather the scraps together and set aside. Place the crackers on one or two parchment-lined baking sheets and chill until firm, about 30 to 45 minutes.
Adjust the oven rack to the upper and lower positions and preheat the oven to 350 degrees. Gather the scraps together into a ball, chill until firm, and reroll. Dust the surface with more flour and roll out the dough to get about two or three more crackers.
Mark a vertical line down the middle of each cracker, being careful not to cut through the dough. Using a toothpick or skewer, prick the dough to form two dotted rows about 1/2 inch for each side of the dividing line.
Bake for 11-12 minutes, until browned and slightly firm to the tough, rotating the sheets halfway through to ensure even baking. Cool on rack for a few minutes.
Please visit the Daring Kitchen to see what other fabulous bakers have created this month!